Version Control with Git
Introduction
Version control software provides a systematic way to keep track of changes made to files. There are a number of version control software (VCS) systems … Git is one of them. It’s a powerful tool for tracking and reconciling changes to text files from individual or multiple contributors. The basic unit of Git is the repository. Unlike some other VCS, Git tracks changes by storing snapshots of entire repository at different points in time. This is internally different from “delta-based” system that just keeps track of changes to the files. While Git can be used as a standalone piece of software, many people leverage web hosting platforms that expand the VCS functionality and have project management and collaborative features built in. Several examples of these services include Bitbucket, GitLab and GitHub.
GitHub
As we mentioned in the introduction, GitHub is a web-based platform for hosting Git repositories. The platform includes a web interface to explore files and perform version control operations, as well as a number of collaboration tools for commenting, opening requests for new features, using project management methods, social networking, creating versions of software releases, and many more. GitHub is an extremely popular service, particularly among software developers and scientists who want to share code as part of “open source” projects.
1. Log into github.com
To begin with we’ll log into github.com
If you haven’t already created an account, make sure you follow the steps to create one.
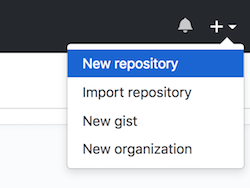
2. Click the + icon and select “New repository”
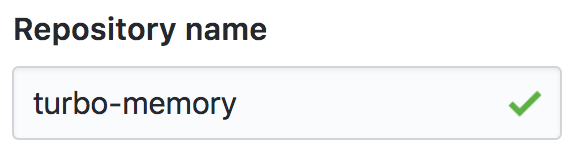
3. Give the repository a name
Like the prompt suggests, repository names should be short and memorable. And they must be unique to your account … i.e. you can’t have two repositories in your account with the same name.
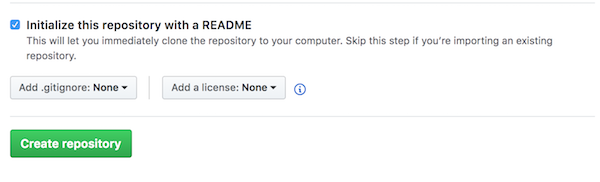
4. Check the box to “Initialize this repository with a README”
New repositories on GitHub require contents to initialize. To get started, we can initialize with a README file, which are typically included in repositories to provide a description of content, usage and / or any necessary software setup.
5. Create a new file
GitHub provides a file editor in the browser. We’re going to make use of that here to demonstrate some basic concepts of version control … but nb that editing files this way is not a typical workflow, especially if you’re storing versions of your code locally (on your computer) and remotely (on GitHub). More on that later …
smpl <- rnorm(1000)

xbar <- mean(x)
s <- sd(x)

hist(smpl)
6. Edit the file
smpl <- rnorm(1000)

xbar <- mean(x)
s <- sd(x)

hist(smpl)
abline(v = xbar, lwd = 2, col = "red")
abline(v = xbar + 2*s, lwd = 2, col = "red", lty = 3)
abline(v = xbar - 2*s, lwd = 2, col = "red", lty = 3)
7. Take a look at the commit history and branch explorer

Each change to the repository (or commit) is recorded and tracked separately via a unique combination of characters. This hash is abbreviated in the commit history view, which provides an interface to explore the file(s) and line(s) that were changed as part of the commit.
GitHub also provides a view of branches, which you can think of as a collection of commits that can represent an entirely different version of the repository. Ultimately, you can perform a merge operation to combine changes across branches. This can be particularly helpful for collaborations between multiple individuals or for a single developer who would like to keep the “experimental” features separate from stable code.
As mentioned above, the fundamental unit of Git is the repository. The steps we’ve completed up until now have introduced the basics of creating, committing and tracking changes within a single repository. However, GitHub allows its users to have multiple repositories. In some cases, rather than creating a repository from scratch you might need to fork another user’s repository. This workflow can be useful for collaborative projects, as it essentially copies the contents and complete version control history at a single point in time.
8. Fork a repository
To illustrate the idea of forking, we’ll need to start with an existing repository. For this exercise, we’ve created a repository that will include a comma separated value (.csv) file with data on our favorite foods.
Each of us will fork this original repository … and in doing so create new repositories with all the files and previous changes in our accounts.
Navigate to
https://github.com/uvasomrc/foods and click the Fork button in the upper right-hand corner of the page.

9. Make a unique change to an existing file
Find the line with your initials in foods.csv, and after the comma enter your favorite food. If you don’t find your initials in the list, feel free to add a new line with your initials and favorite food separated by a comma.
10. Submit a Pull Request
The pull request mechanism allows contributors to propose changes to the owner of the upstream repository. That owner can review these changes, and conditionally accept or reject them. This process may involve ongoing dialogue and review, during which time the proposed changes can be updated by editing the forked repository.
Git (Command Line Interface)
Thus far we’ve managed our version control activities using the GitHub platform, which has a Graphical User Interface (GUI). Git as a program also has a command line interface (CLI), which can be extremely useful whether you’re managing repositories locally or remotely. In this part of the workshop we’ll cover some common workflows using the Git CLI.
1. Fork the quality/ repository
To motivate the Git CLI material, we’ve created a repository with an example python script that creates diagnostic plots of read quality scores for sequence data.
Start by forking this repository on GitHub:
https://github.com/uvasomrc/quality
2. Confirm that git is installed and configured on your computer
Now that you have the repository forked to your GitHub account, we’ll clone it locally. To work with Git on your computer, you’ll need it installed:
Mac has the Terminal app, and Windows has Git BASH.
From the command line, confirm that Git is installed by calling it by name followed by the --version flag.
git --version
If the command above returns the version without error, then you have Git successfully installed.
There’s one more step to configure the program post-installation. Each commit is associated with an author and email address. To check if you have a globally configured username and email address use the following command:
git config -l
If you don’t see anything returned, then you’ll need to do the configuration:
git config --global user.name "{YOUR_NAME_HERE}"
git config --global user.email {YOUR_EMAIL_ADDRESS_HERE}
3. Clone the repository
With Git installed and configured you are now ready to clone the repository contents and commit history to your computer.
Cloning the repository will create a new folder as a subdirectory of your current working directory. If you’re not sure where that is, in your terminal you can print the working directory:
pwd
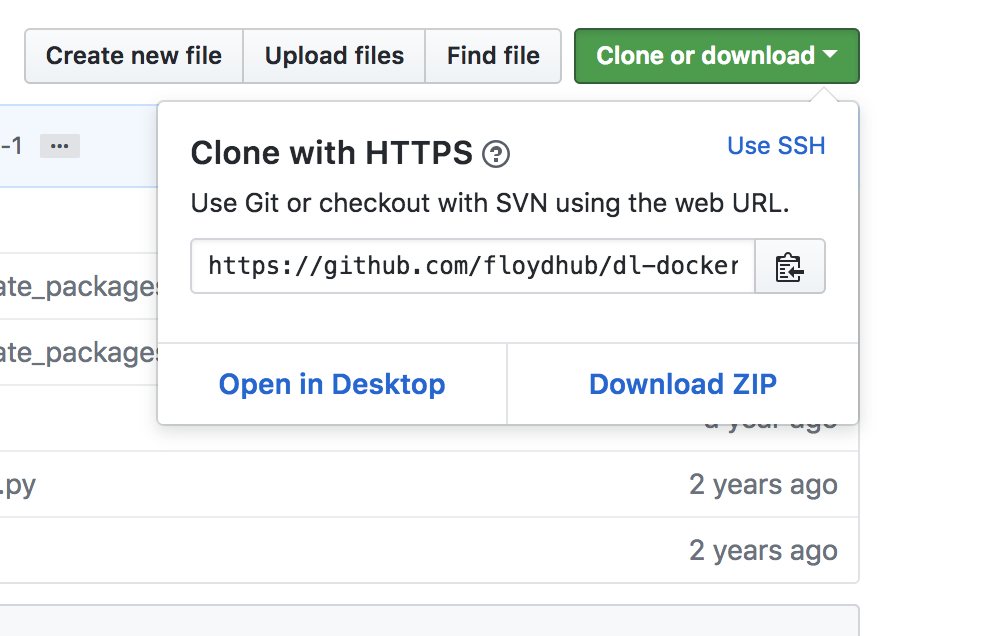
Navigate back to your repository on GitHub and find the Clone or download button, and click it to expand. Copy and paste the Clone with HTTPS link:
https://github.com/{YOUR_ACCOUNT_NAME_HERE}/quality
Use git clone followed by the link (above):
git clone {CLONE_WITH_HTTPS_LINK_HERE}
4. View the log of commits
After cloning to your computer, you now have a new folder with all the files and version control history from the remote repository. You can navigate to this directory and list all the contents:
cd quality
ls -la
As you can see, on your computer you now have all the files from the remote and something called .git, which is a hidden folder that includes the information that Git uses to track versions of the code.
To access the history of commits (starting at the point in time when you cloned the repository) use the following:
git log
5. Check the status
As you work with the code it’s good practice to keep an eye on the status of your code base:
git status
6. Run qcheck.py
As described above this repository contains code written in python (qcheck.py) … this script loads sequence data stored in .fastq format and produces some simple diagnostic plots. The data/ folder includes some example files so you can run the script. Keep in mind you’ll need python, as well as the biopython and matplotlib modules installed (see
README of the quality).
With those requirements satisfied you can execute the script as follows:
python qcheck.py data/SRR622461_2.fastq data/SRR622461_2.fastq
7. Edit the script and re-run it
Now let’s edit the script. One parameter we might want to adjust is the number of reads plotted (see
line 19 of qcheck.py) … let’s try changing that from 50 to 60:
vim qcheck.py
Re-run the script:
python qcheck.py data/SRR622461_2.fastq data/SRR622461_2.fastq
8. Check the status and view the diff
The status of the repo will show us that we have made changes:
git status
The diff command is very useful in seeing the actual changes we’ve made:
git diff
The output from diff includes line-by-line additions and subtractions. For more information, refer to the
resources
9. Stage and commit the change made to qcheck.py
Let’s presume we want to keep track of the edits to qcheck.py. Before we commit the changes, we need to first add (or stage) them to be committed:
git add qcheck.py
Check the status again and confirm that the edits are staged:
git status
Now try using git commit followed by the file name:
git commit qcheck.py
Oops. That didn’t work … why not?
Every commit requires a message specifying what and why a change was made. You must include a message passed in quotes after the -m flag. While this is technically just a “subject line” for the commit (you can write more descriptive message “bodies”), in most cases this is sufficient to annotate the changes:
git commit -m "increased number of reads to be plotted and changed plot file name"
It is worth noting here that Git users have varied philosophies and practices regarding writing commit messages. For more information, refer to the resources.
The commit we just made is associated with a unique hash, which is an alphanumeric reference for the code at the exact point time when we committed the change(s). You can refer to this hash (or an abbreviation) of it with other Git commands, and you’ll see it in the log:
git log
10. Synchronize these changes with the repo on GitHub.com
Given that the repository we are working with was originally cloned from GitHub, there is a remote URL associated with the repository:
git remote -v
We can send our changes to the remote repository with a push command followed by the name of the remote (default is origin) and name of branch (default is master):
git push origin master
Note that sending the commit(s) we’ve made up to the remote GitHub repository requires:
- An internet connection
- Authentication to GitHub (you need to essentially “log in” through the command line)
- Verification that the GitHub account you are using has permissions to update the remote repository
If you have a SSH (Secure Shell) key set up, you’ll see a message saying that the changes have been synchronized on GitHub. If not you’ll need to enter your GitHub username and password.
You can persistently associate your computer with your GitHub account (so you don’t have to enter your username and password every time) you can set up an SSH key:
https://help.github.com/articles/generating-a-new-ssh-key-and-adding-it-to-the-ssh-agent/
If you visit the remote URL, you should see the changes you made to qcheck.py, along with the hash / message associated with your commit.
You may have noticed that not all the files in your quality/ folder on your computer appear on GitHub. For example, the if you look in the plots/ folder on GitHub you won’t see the .png files … and that’s intentional.
One of the files we’ve included in our repository is a .gitignore file, which serves as a relay to Git regarding what not to track. You can use wildcards (*) to exclude all files that exist in a certain subdirectory, end in a certain suffix, start with a certain prefix, etc.
Let’s change gear a bit … we’ll still be working with the Git CLI, but rather than starting by cloning a remote repository we’re going to instead initialize a new one locally.
11. Create and initialize a new Git repository
To create a Git repository we first need a new directory (or folder):
cd ..
mkdir clock
cd clock
Once we’ve created the clock/ folder and have changed down into it, we can run git init to initialize the folder as a Git repository:
git init
From now on, Git will know to look for changes to files inside of clock/.
12. Create, add and commit files for the clock
With the repository initialized, we will create two files (README.md and clock.sh) … start by making empty files using touch:
touch README.md
touch clock.sh
Is Git keeping track?
git status
Now stage and commit both at once (the . stages all the files that have been changed):
git add .
git commit -m "adding skeleton of scripts"
git status
13. Edit, add and commit the README file
We have two empty files that we’ve committed … now let’s add some content.
Start with the README:
vim README.md
# Clock

This repository contains a script that returns the time when executed.

## Usage

`bash clock.sh`
Now stage the changes to README.md:
git add README.md
And commit them:
git commit -m "adding README with description and instructions"
14. Edit, add and commit the clock script
clock.sh will have the actual code for our BASH program:
vim clock.sh
#!/bin/bash

d=$(date '+%H:%M:%S');
printf "the time is ...\n$d\n"
git add clock.sh
git commit -m "added the bash clock script"
15. Sync the local repository with a GitHub remote
The local Git repository we’ve just created is entirely independent of GitHub:
git remote -v
However, we can associate our local repository with GitHub.
First, we’ll need to create a new repository on GitHub. It’s probably a good idea to use the same name as your local repo for this.
Make sure none of the boxes to “initialize” are checked on GitHub
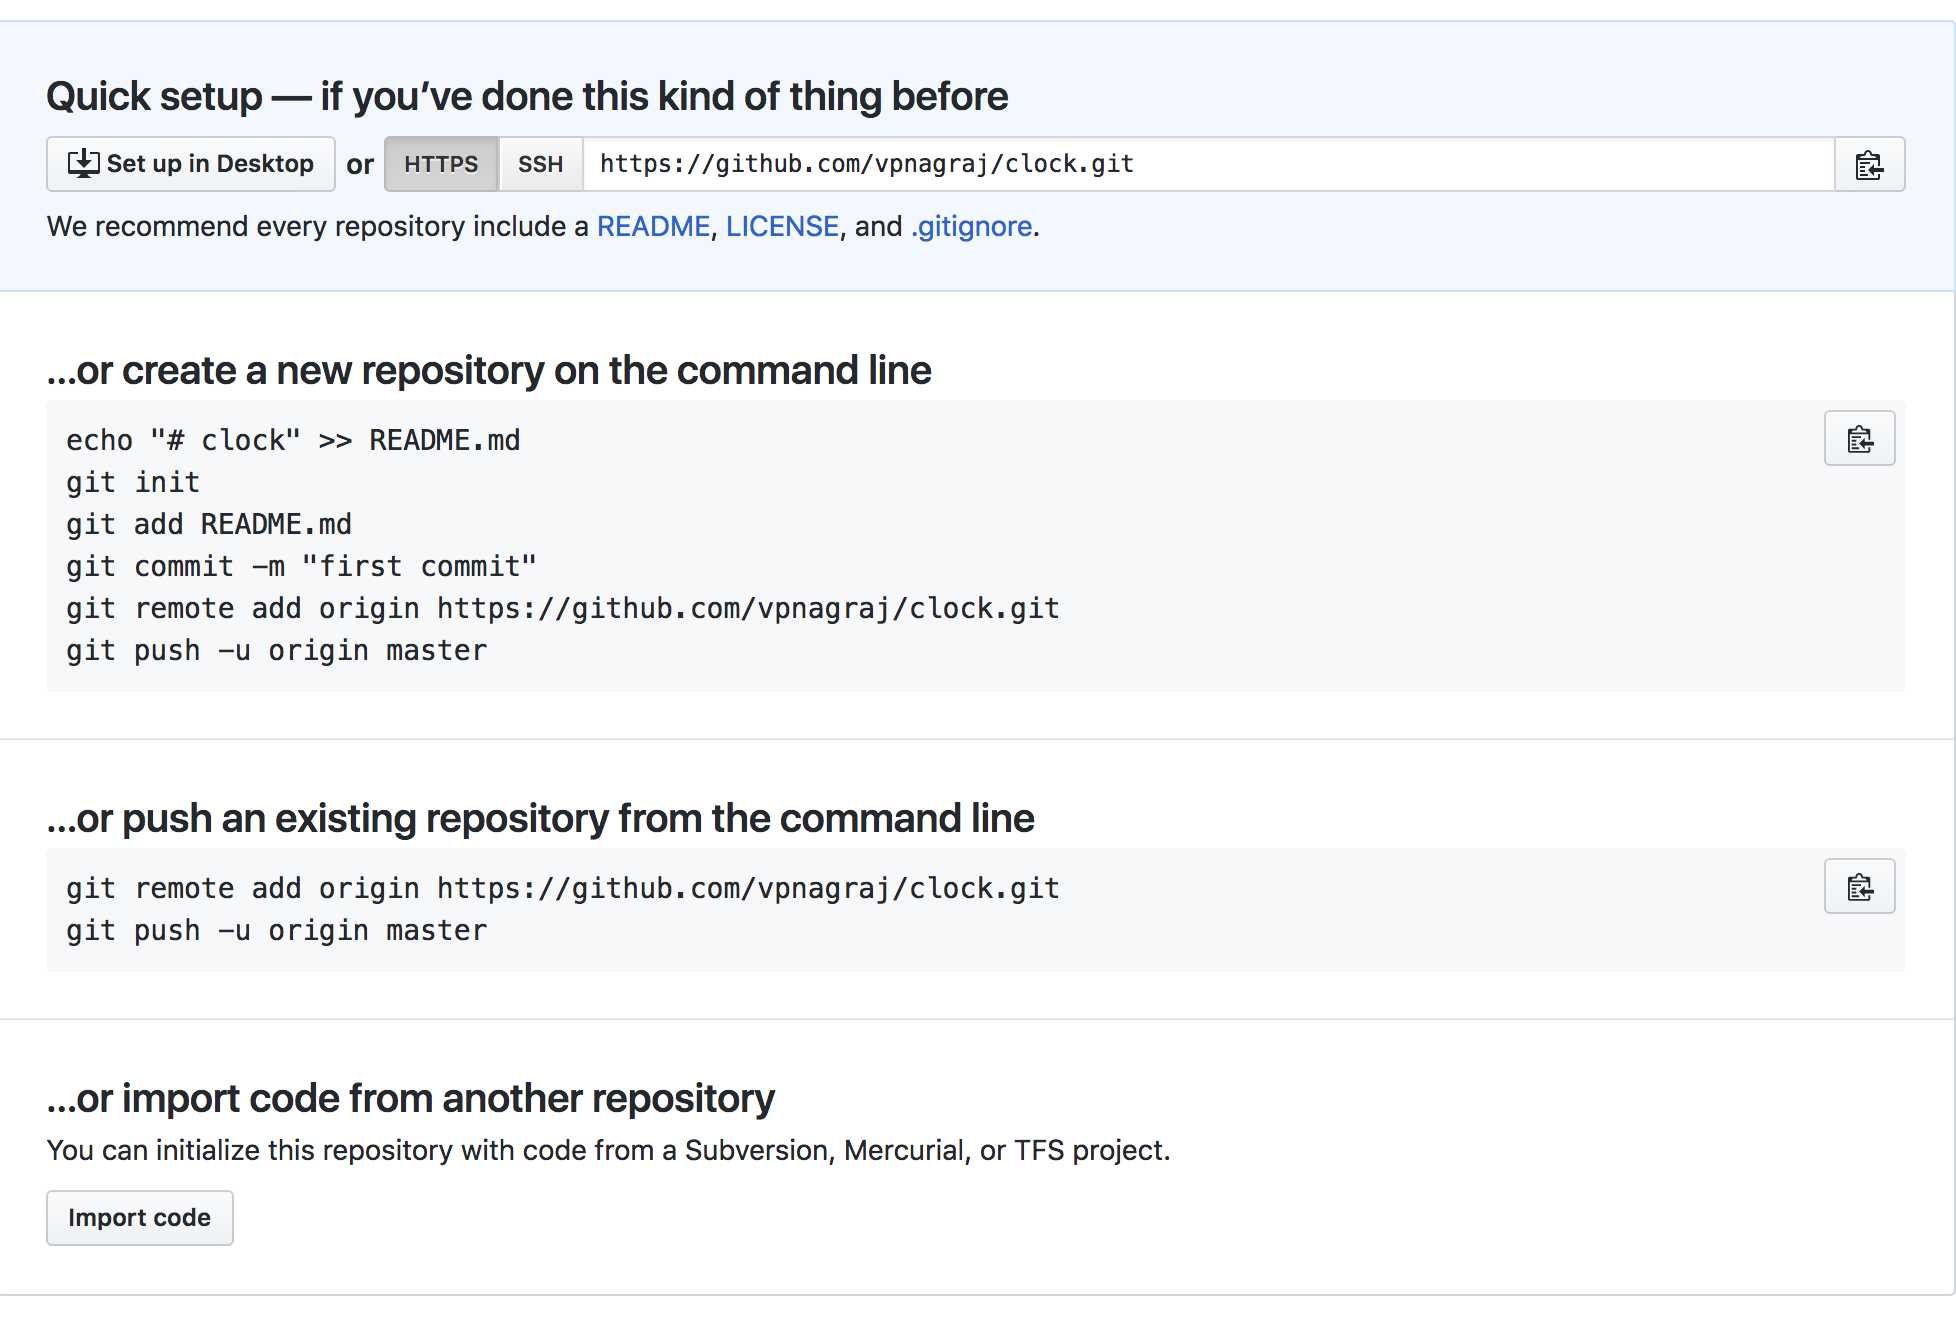
Now from the command line, we can add connect the remote we just created to our local Git repository:
git remote add origin https://github.com/{YOURREPONAMEHERE}
git push -u origin master
Whether your on a remote or local … a fork or upstream … you can further organize and track code in Git with a branch structure.
16. Create a new branch
A branch is essentially a detour from the code base at a particular commit in history. As it turns out, we’ve been actually using a branch already, albeit the default master:
git branch -v
To create a new branch use git checkout with the -b flag followed by the name for the branch:
git checkout -b feature
Now if we look at the branches with the -v option, we see that there is now a branch called feature:
git branch -v
The * indicates that we are “on” the feature branch, and all of our subsequent commits will be applied until we switch branches again.
17. Edit, add and commit the file on the new branch
Let’s modify our clock program, and add and commit those changes to this branch:
vim clock.sh
#!/bin/bash

d=$(date '+%H:%M:%S');
printf "the time is ...\n$d\nhave a nice day\n"
git add clock.sh
git commit -m "adding new feature to the clock script"
18. Checkoutmaster again
Change back to your original branch (master) with the following:
git checkout master
19. Make a new edit, then add and commit that change
Try modifying the same line on master as we did on feature:
vim clock.sh
#!/bin/bash

d=$(date '+%H:%M:%S');
printf "the time is ...\n$d\nhave a nice day!\n"
Add and commit the changes:
git add clock.sh
git commit -m "adding 'have a nice day!' to the clock"
20. Attempt to merge the changes from the feature branch
Branching is helpful in that ultimately you can merge changes from multiple branches into one.
Because we are currently on the master branch, the following will attempt to merge changes from feature into master:
git merge feature
However, as you see there is a conflict between the two branches. Using a text editor we can view and resolve this conflict:
vim clock.sh
Exercises
The exercises are intended to give you a chance to explore and use the tools discussed in the morning lecture. These exercises introduce new concepts as well, and in doing so point towards various tools and documentation. Feel free to spend as much or as little time with each prompt.
1. Learn Git Branching
Git branching is an important and sometimes difficult concept to learn. A group of developers has created a very helpful tool for exploring how branches behave.
Go through the Learn Git Branching exercises:
https://learngitbranching.js.org/
Alternatively, visit the sandbox to interactively make commits, create branches, merge branches, etc.:
https://learngitbranching.js.org/?NODEMO
2. Good Commit Messages
Every git commit requires an accompanying message. At minimum this should be a single “subject line” briefly describing the changes made. However, the commit message can include a “body” with more thorough and descriptive notes about how / why the edits were implemented. These comments are particularly useful for a future maintainer or contributor … and that person might be you! So you can do yourself a huge favor by creating good commit messages.
Take some time to read a blog post by developer Chris Beams titled “How to Write a Git Commit Message”:
https://chris.beams.io/posts/git-commit/
Try making a new commit locally to your quality/ repository. Use a commit message with a body.
3. Syncing a Fork
When you fork a repository, you bring along all the files, commits and associated version control information … starting from the point in time when it was forked.
As you continue to work on your fork, the upstream repository (from which you originally forked) may or may not be static. The owner or other contributors might modify the contents, creating commits that depart from the tree structure that you are tracking.
To keep up with these changes you must sync the fork:
https://help.github.com/articles/syncing-a-fork/
Use the documentation above to sync your fork of the foods/ repository with the upstream:
https://github.com/uvasomrc/foods
4. Create a conflict
The basic unit of Git is the repository. However, GitHub slightly extends to this concept in its Gist service, which essentially allows users to upload snippets of code without having to track an entire repository.
For this exercise, you’ll be working from code hosted in a GitHub Gist:
https://gist.github.com/JonathanMH/397fc427842614dd4803
Start by cloning the Gist:
https://help.github.com/articles/forking-and-cloning-gists/
create_conflict.sh is a shell script that demonstrates what happens when there is a conflict in git commits. Try running it on your computer … and if you’re not sure how to do that, Google it!
Make sure you are running this script relative to a directory location (folder) that you are comfortable making a new folder called git-repo/ … feel free to delete this folder after the exercise.
5. GitHub Pages
In addition to hosting free public repositories, GitHub also provides a service to host static websites called GitHub Pages:
Follow the 5 steps on the GitHub Pages website to get started.
If you would like a more advanced example, try forking the following repo:
https://github.com/onlywei/explain-git-with-d3
Forking remotely copies an upstream repository from one account to another. Because it is operating on the repository level, the fork inherits all commits and branches. In this case the explain-git-with-d3 repo includes branch named gh-pages. As a service, GitHub.com will host anything that is stored in a gh-pages branch. To access the hosted version of the contents, you can go to https://{USERNAME}.github.io/{REPOSITORYNAME}